
There is nothing quite like the feeling of unboxing a fresh, custom vinyl decal. Whether it’s a massive graphic banner for your rear window or a precision-cut slap sticker to accent your trim, you’re only one step away from transforming your machine.
But then, reality sets in. One wrong move can leave you with trapped air bubbles, crooked lines, or a piece of ruined vinyl.
Applying vinyl decals perfectly is an art form, but it doesn’t require decades of experience. Follow this definitive, step-by-step installation guide to get bubble-free, flawless results every single time.
“A great build isn’t defined by how much you spend under the hood—it’s defined by the patience, precision, and passion you put into every single detail. Take your time, lay the ink down straight, and let your car tell your story.”
The Toolkit
Before peeling anything, make sure you have your tools laid out. Having these ready prevents mistakes once the adhesive is exposed:
A Precision Knife or Needle: Just in case you need to pop a stubborn bub
Isopropyl Alcohol (70% or higher): The ultimate prep cleaner.
A Squeegee: A dedicated vinyl squeegee (preferably with a soft felt edge) or a standard plastic card wrapped in a microfiber cloth.
Masking Tape: For measuring and locking the design in place.

The Golden Rule of Prep (Clean, Then Clean Again)
The number one cause of sticker failure isn’t the vinyl—it’s what is trapped underneath it. Even a microscopic speck of dust will create an unsightly pimple on your otherwise perfect decal.
Avoid standard glass cleaners like Windex, as they often leave behind a slick chemical residue or silicone layer that prevents the adhesive from bonding permanently. Wash the area thoroughly with soap and water, dry it, and then do a final pass using 70% isopropyl alcohol and a lint-free microfiber towel.
Use the “Hinge Method” for Perfect Alignment
Never try to “eyeball” a large or complex die-cut decal. Instead, leave the backing paper completely on and use the hinge method to lock in your alignment mathematically.
1) Position the decal exactly where you want it on the clean surface.
2) Run a long strip of masking tape horizontally across the dead center of the decal, anchoring it firmly to the car on both sides. This acts as your secure hinge.
3) Flip the top half of the decal downward over the hinge, and carefully peel away the white backing paper from only that top half. Cut the exposed backing paper away with your precision knife.

The Squeegee Motion (Center Outward)
Now it’s time to lay down the vinyl. The secret to avoiding air pockets is maintaining constant tension and working from the middle toward the edges.
Slowly flip the top half back up, holding the transfer tape tight and taut. Using your felt-edge squeegee, make overlapping strokes starting right at the masking tape hinge and working your way out to the top edge. Once the top half is secured, remove the masking tape hinge, flip up the bottom half, peel the remaining backing paper, and squeegee downward from the center out.
The Slow Reveal
Once the entire graphic is flattened, give the transfer tape one final, firm squeegee pass across the entire design to fully activate the pressure-sensitive adhesive.
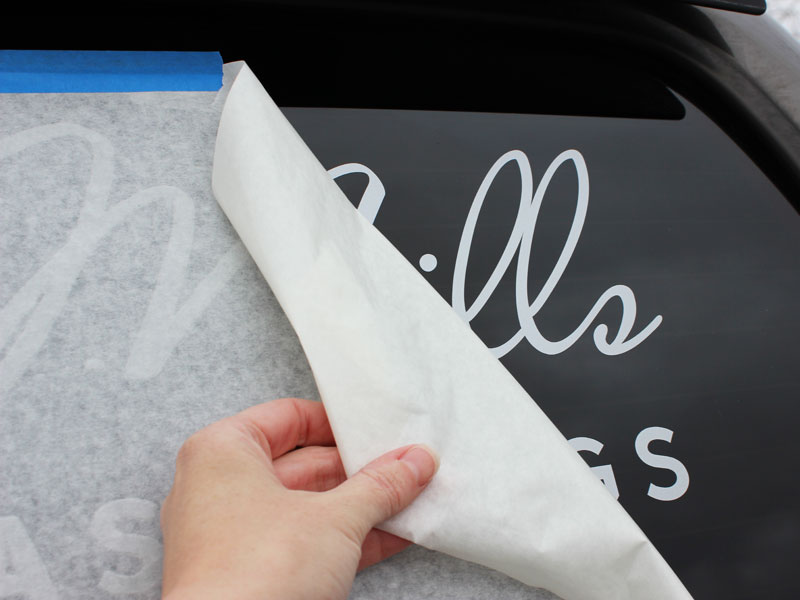
Don’t rip the clear transfer tape off straight toward you. Instead, start at one corner and peel it back slowly at a sharp 180-degree angle, keeping it flat against the vehicle surface. If any part of the vinyl begins to lift up with the tape, simply flip it back down, rub it firmly with your squeegee for 10 seconds, and try peeling again at a sharper angle.
Help! I See a Bubble. What Now?
If you still end up with a small air bubble, don’t panic, and do not try to scrape it aggressively with your squeegee, as this can stretch or scratch the vinyl.
- If it’s tiny: Leave it alone. Automotive-grade vinyl is breathable. Over the course of a few days in the warm sun, minor micro-bubbles will naturally gas out and disappear on their own.
- If it’s large: Take your precision knife or a fine sewing needle and prick the very edge of the bubble. Gently use your thumb to push the trapped air out through the tiny pinhole. The vinyl will settle down flat and the hole will be completely invisible.
Now step back, grab a cold drink, and admire your flawless, professional-grade installation!
Takeaways for a Flawless Finish
Achieving a professional-grade decal application isn’t about luck—it’s about patience, preparation, and sticking to a proven process. Before you head out to the garage, keep these essential rules in mind:
- Prep is Everything: A beautiful install is entirely dependent on a pristine surface. Skip the household window cleaners and always opt for a thorough wipe-down with isopropyl alcohol to remove hidden oils.
- Trust the Hinge: Never eyeball your alignment or peel the backing paper all at once. Locking your design down with a masking tape hinge guarantees your sticker lays down exactly where you intended.
- Work Center-Outward: Always squeegee from the middle toward the edges using smooth, overlapping strokes. This forces the air outward, eliminating trapped bubbles before they even have a chance to form.
- Peel Low and Slow: When removing your clear transfer tape, pull flat and parallel to the surface at a sharp 180-degree angle. If the vinyl lifts, simply lay it back down, firm it up with your squeegee, and try again.
With these techniques in your back pocket, you are ready to transform your ride, your gear, or your workspace like an absolute pro. Take your time, trust the process, and enjoy the new look!

Leave a Reply